Learn about Mutation Observer in 8 Minutes

If you’re a web developer, you’re probably familiar with the concept of DOM manipulation. As you dynamically update the HTML, CSS, or the structure of the Document Object Model (DOM), it can be difficult to keep track of changes in the structure or content of an element. This is where Mutation Observer comes into play.
Mutation Observer is a JavaScript API that allows you to detect and respond to changes in the DOM. With Mutation Observer, you can track changes to specific nodes, monitor for specific attributes or child elements, and execute custom functions in response to these changes.
Some practical use cases for this API could be
-
Updating the UI in response to user actions: Mutation Observer can be used to update the UI in real time in response to user actions. For example, you could use Mutation Observer to update the UI when a user adds or removes items from a shopping cart.
-
Lazy Loading Images: Mutation Observer can also be used to implement lazy loading of images. By observing changes to the DOM, you can detect when an image becomes visible and then load the image at that point. This can improve the performance of your website by reducing the amount of data that needs to be loaded on the initial page load.
-
Validating Forms: Mutation Observer can be used to validate forms in real time. By observing changes to the form, you can detect when a user has entered invalid data and provide feedback in real time. This can improve the user experience and reduce the likelihood of user errors.
There’s also a video version of this available on Youtube.
Creating a mutation observer
You create a new MutationObserver using its constructor and pass in the callback function inside it. This observer exposes an observe method that takes 2 arguments. The first one is the node or the node tree for which you want to observe the changes. The second argument is an options object that allows you to define the configuration for the observer.
    function cb(mutations){
      //do something on mutation
    }

    const observer = new MutationObserver(cb)

    observer.observe(target_node, options)
The configuration options are again, pretty straightforward.
-
childList: Boolean - If set to true, observes the addition or removal of child nodes inside the target/parent node.
-
attributes: Boolean - Watches for changes to the value of attributes on the node.
-
characterData: Boolean - Watches for changes in the character data contained within a node.
You’ll need to add at least one of the three properties to the options object. It would not make sense to create an observer and tell it to track nothing inside a DOM node(it’ll also throw an error to keep you in check), so make sure to add at least one of the first three.
-
subtree: Boolean - The first three properties are applicable to the node that we pass inside the observe method. If we add the subtree property, then it’ll monitor all the elements under the target node(nested elements) for mutations. So for example, setting the childList property to true will track mutations for the direct children of the target node. Setting subtree to true along with the childList property will now monitor all the nested elements instead of tracking just the top-level nodes. You can pair subtree with attributes or characterData as well.
-
attributeFilter: Array - This is the only property that expects an array instead of a boolean value. This property specifies which attributes to be monitored and ignores the rest, to improve performance.
-
attributeOldValue: Boolean - Goes in conjunction with attributes. Will record the previous value of an attribute on each mutation.
-
characterDataOldValue: Boolean - Goes in conjunction with characterData. Will record the previous value of a text node’s character data on each mutation.
One final thing that you’ll need to take care of, just like with any other listener, is a memory leak. There’s a disconnect method available to avoid a memory leak with mutation observers. Make sure to use it once you’re done monitoring the node.
observer.disconnect()Observing childList
The script below renders an unordered list with some items and 2 buttons that can add or remove an item respectively. Nothing fancy.
    <ul id="item_list">
        <li>Item 1</li>
        <li>Item 2</li>
        <li>Item 3</li>
        <li>Item 4</li>
    </ul>
    <button id="add_item">Add item</button>
    <button id="remove_item">Remove item</button>

    <script>
        const addButton = document.querySelector("#add_item")
        const removeButton = document.querySelector("#remove_item")
        const list = document.querySelector("#item_list")

        addButton.addEventListener("click", (e) => {
            const currentId = list.children.length
            const listItem = document.createElement('li')
            listItem.innerHTML = `<li>Item ${currentId + 1}</li>`
            list.append(listItem)
        })
        removeButton.addEventListener("click", (e) => {
            const lastElementIndex = list.children.length - 1;
            const lastElement = list.children[lastElementIndex]
            list.removeChild(lastElement)
        })
    </script>
Now create a mutation observer and add it right below the event listeners. Inside the callback function, I’m just going to log the mutations array to the console. The mutations array that we get as part of the callback acts as a queue for all the mutations that happen inside a node tree. I’ve also set the childList property to true, for now, so the observer will only report mutations that affect the direct children of the list i.e the <li> elements.
    ...
    const callbackFunc = (mutations) => {
        console.log(mutations);
    }

    const observer = new MutationObserver(callbackFunc)
    observer.observe(list, {
        childList: true
    })
Inside the browser, if you add or delete a list item, you’ll get a mutation record in the console that should look something like this.
    //ChildList Mutation Record
    {
      addedNodes: NodeList [li]
      attributeName: null
      attributeNamespace: null
      nextSibling: null
      oldValue: null
      previousSibling: li
      removedNodes: NodeList []
      target: ul#list
      type: "childList"
    }
It gives you a good insight into the mutation, what type is it, what node did it originate from, etc. P.S If you remove an element instead of adding one, the removedNodes property would have an element inside the list.
Observing attributes
The second data item that we track using Mutation Observers would be attributes. To see this in action, let’s add a style attribute to the list element and set the background to a specific color. Also, make sure to set the attributes property to true inside the observer’s config object.
    <ul id="item_list" style="background: yellow;">
      ...
    </ul>


    ...
    observer.observe(list, {
        childList: true,
        attributes: true,
    })
Inside the browser, from the elements section of the dev tools, try changing the background color to something else. In the console, you’ll find a mutation record of the type attributes.
    //Attributes Mutation Record
    {
      addedNodes: NodeList []
      attributeName: "style"
      attributeNamespace: null
      nextSibling: null
      oldValue: null   <--- Can get this value by adding attributeOldValue
      previousSibling: null
      removedNodes: NodeList []
      target: ul#list
      type: "attributes"
    }
If you add the attributeOldValue property to the observer config and set it to true, you’ll also get the previous value for the mutation.
Finally, when it comes to the attributes event, you also have an option to selectively choose which attributes to monitor for changes using the attributeFilter option. In our current example, we’re only tracking one attribute but this will make more sense if you have an element with a bunch of attributes.
Try passing in an empty array to the attributeFilter property inside the observer config. This explicitly tells the observer to ignore all the attributes so now when you edit the background color of the list, there should be no mutation records in the console.
Observing characterData
Now the final data item which is the characterDatais a bit tricky. We first need to understand what exactly is the characterData. Any text element that you know like a <p> tag or a <span> tag or even an <li> tag has a text node inside it. The data that is present inside this text node, is what’s called character data.
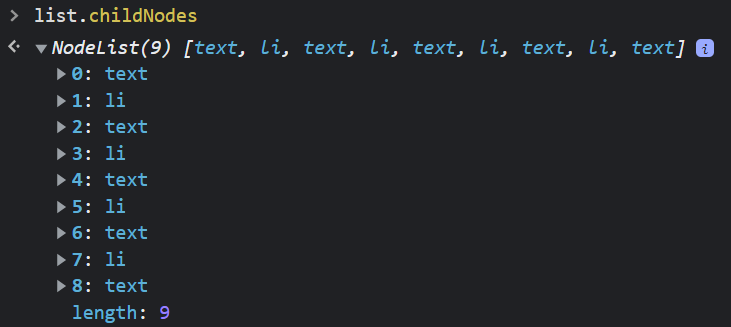
So inside your console, you can access the list’s child nodes using list.childNodes. Inside the list, you’ll find the <li> elements along with some text nodes. These text nodes represent the new line string before each list item. So while you would think there are only 4 nodes inside the list, there are actually 8.
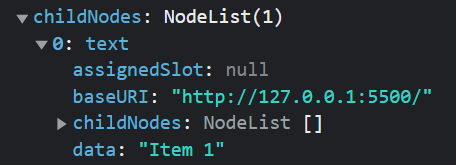
Now open up any one of the list elements and you’ll find another childNodes property with a single text node in it. This is the text node that contains the <li> element’s character data.
Now to test this out in our example, we’ll make some minor changes. We’ll test this on the first <li> element of the list. So add a contenteditable attribute to that element so that we can change it’s content/character data. Also, add the characterData option and set it to true inside the config.
    <ul id="list" style="background: yellow;">
      <li contenteditable="true">Item 1</li>
      ...
    </ul>


    ...
    observer.observe(list, {
        childList: true,
        attributes: true,
        attributeOldValue: true,
        characterData: true
    })
Up until now, we were observing changes on the list element but now we want to track changes on the first list item. So let’s get a reference for that list item and then replace it with the target node inside the observer’s observe method.
    ...
    const list = document.querySelector("#list")
    const firstItem = list.childNodes[1].childNodes[0]
    ...


    observer.observe(firstItem, {
      ...
    })
Now if I go to the browser and try to type in something inside the first item, it should log a characterData mutation record inside the console.
    //CharacterData Mutation Record
    {
      addedNodes: NodeList []
      attributeName: null
      attributeNamespace: null
      nextSibling: null
      oldValue: null   <--- Can get this value by adding characterDataOldValue
      previousSibling: null
      removedNodes: NodeList []
      target: text
      type: "characterData"
    }
The target now should point to the text node. And similar to attributeOldValue in the case of attributes mutation type, you can attach a characterDataOldValue to the config object, to get the previous value.
Now there’s still one problem in this implementation. If you delete the entire string and then try to type something, there will be no new mutation records. That’s because once you delete the entire string, the text node that you were tracking also gets deleted. So after deleting everything, when you try to retype something inside the element, it’s actually a completely new element and not the one that you have as a reference inside the firstItem variable.
To solve this problem, we can use the subtree property. With the subtree property set to true, all the elements inside the <li> tag will be tracked for changes. So even after you get rid of the text node, the new text node you get once you start typing again will still be tracked. So you’ll see the mutation records even after deleting and retyping the text.
If this sounds complicated, I recommend watching the video where I’ve tried to explain this with more examples.
Now inside the script, you need not track the list element. Since you’ll be using the subtree property, everything inside the list element will be tracked. Also, make sure to set the subtree property to true inside the config.
    const firstItem = list.childNodes[1]  //This will work just fine
    ...
    observer.observe(firstItem, {
      ...
      subtree: true
    })
Now if you go back to the browser, try getting rid of the text inside the list element and start typing again. You’ll see mutation records of the type characterData as expected.
Conclusion
That should do it for this post. Mutation Observer is a powerful JavaScript API that allows you to detect and respond to changes in the DOM. By using Mutation Observer, you can create dynamic and responsive web applications that improve the user experience. So, whether you’re a beginner or an experienced developer, be sure to add Mutation Observer to your toolkit and start exploring its many possibilities.